POS Checkout v.1 - Init page code
With a simple HTML code snippet embedded in your e-commerce checkout page you can switch the POS Checkout available features on (or off).
As you should be aware of, reading POS Checkout Overview page, checking out is actually made up in two phases:
- delivering a checkout page where customer can start a DropPay payment from (Authorization)
- waiting for the Authorization result
While the former phase is straightforward and common for all the UX, the latter one depends strongly upon customer device used to browse your e-commerce site and can be tricky.
Checkout User Flows
Starting from the premise that DropPay user will always approve a payment proposal, under the form of POS Authorization, first acquiring it in his DropPay mobile app, then setting it using the secret PIN, the POS Checkout be slightly different from case to case.
User browsing and paying with a different device
User is paying with a different device from the one he's browsing your e-commerce site, then Checkout modal windows will remain opened on a device, while the payment flow will continue on the smartphone running the DropPay mobile app.
When the modal receive the confirmation that user has set the payment authorization it closes and return the control to your site submitting
At the same time, if you had set the data-loopback-uri property, the payment smartphone will fire up a browser at that location or will open an other application (if the uri scheme was something like myapp://).
The webhook property should contain an appropriate URL published by e-commerce server where DropPay can conveniently post the Authorization event to.
User browsing and paying with the same device
User is paying with the same device from the one he's browsing your e-commerce site, then Checkout modal windows will close as soon as user will have tapped on the button.
In this case the the form Checkout was embedded in won't ever be submitted and data-loopback-uri property value becomes mandatory to drive user back to e-commerce site result page.
In addiction the webhook property should contain an appropriate URL published by e-commerce server where DropPay can conveniently post the Authorization event to.
Dissecting Checkout init page code
All the show starts when you provide your customer's browser with a page containing a chunk of HTML like the following one:
Form
<form action="/your-delivery-page" method="POST" class="form-button">
  <script id="DropPay" src="https://checkout.drop-pay.com/js/droppay-checkout.js"
    data-checkout-key="72655e85806c4cb194fc108e846ed7b0"
    data-amount="2000.00"
    data-date-start="2016-07-16T19:20:30+01:00"
    data-date-end="2016-07-16T19:20:30+01:00"
    data-policy="CHARGEABLE"
    data-max-charges="1"
    data-product-description="Maglev turntable for mars sounds explorations"
    data-custom-id="123122e"
    data-custom-label="label"
    data-loopback-uri="https://merchant.server.com/?a=1&b=2&..."
    data-webhook="https://credenA:credenB@merchant.server.com/listener"
    data-locale="auto"
    data-theme="auto">
  </script>
</form>
Customers browser will fetch the Javascript code and executing it, a button is showing on the page:

Button is showing only if droppay-checkout.js will have successfully performed all its preliminary security checks.
Flows fork
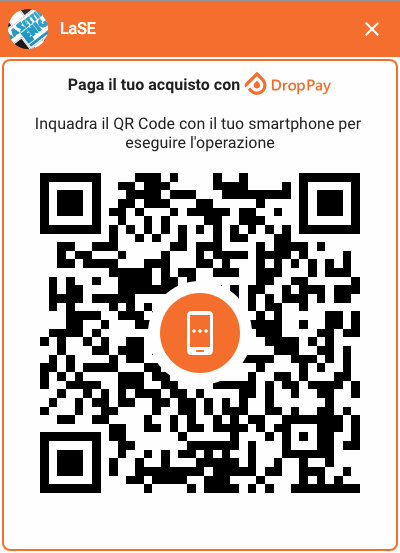
If user is paying with a different device from the one he's browsing your e-commerce site, device is most likely different from a smartphone (User-Agent is detected to guess that).
Then droppay-checkout.js will safely communicate with DropPay servers to open an Authorization procedure and will show up a modal window like the following one:
If user is paying with the same device from the one he's browsing your e-commerce site, device is most likely a smartphone (User-Agent is detected to guess that).
Then droppay-checkout.js will safely communicate with DropPay servers to open an Authorization procedure and will show up a modal window like the following one:
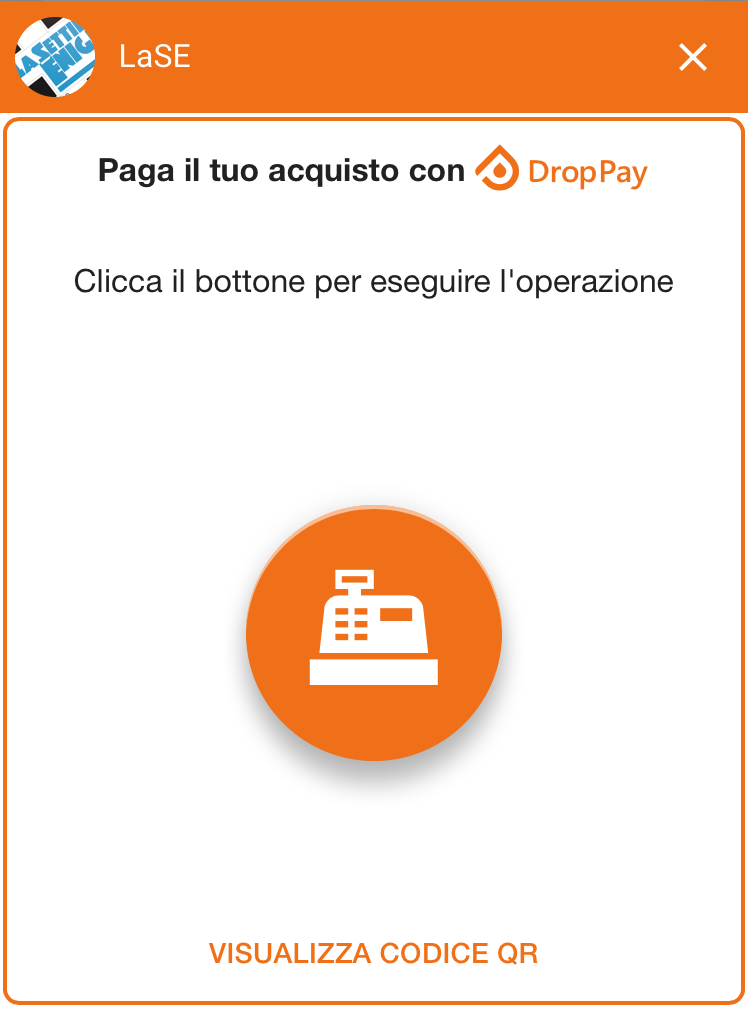
In both the cases User can always switch to the alternative visualization.
<form>
<form action="/your-delivery-page" method="POST">
User watching at your page will see DropPay Checkout modal windows disappearing with a visual animation and your server will receive the form submission with all you form custom fields along with DropPay added ones:
Content-Type: application/x-www-form-urlencoded

dp_authorization_id:CHTQA45B7PA98&
dp_authorization_status:1&
dp_custom_label:XMas Campaign&
dp_custom_id:13412ga723f94t02ncbcv9sf9h
this is a property namethis is a property value- (type, required) is the type of the property;
optionalorrequiredare indicated too - after "-" there's a description
Properties
dp_authorization_id:CHTQA45B7PA98(string, required) - Checkout Public Key value obtained by configurationdp_authorization_status:1(string, required) - Result, one of [0,1] to indicate a failure or a successdp_custom_label:XMas Campaign(string, required) - Custom label set by merchant.dp_custom_id:13412ga723f94t02ncbcv9sf9h(string, optional) - Custom identifier set by merchant.
Configure Checkout transaction with data- fields
All data-* fields are Authorization Arguments you will have fulfilled with actual parameters defining your purchase order and payment.
this is a property namethis is a property value- (type, required) is the type of the property;
optionalorrequiredare indicated too - after "-" there's a description
Properties
data-checkout-key:2ded0c783c5246f0a0f443d426e42967(string, required) - Checkout Public Key value obtained by configurationdata-product-description:Your filled cart(string, required) - Product or service description is being purchaseddata-amount:50.00(string, required) - Amount of the single charge will be performed (DropPay supports only Euro currency)data-date-start:2016-07-16T19:20:30+01:00(string, optional) - Date/time after which the first charge can be performed. Defaults to now().data-date-end:2016-07-16T19:20:30+01:00(string, optional) - Date/time of authorization's expiration. No more charges are acceptable Format ISO-8061.data-custom-id:13412ga723f94t02ncbcv9sf9h(string, optional) - Custom identifier set by merchant.data-custom-label:XMas Campaign(string, optional) - Custom label set by merchant.data-webhook:https://credenA:credenB@app.server.com/listener(string, optional) - URL DropPay will post the authorization object to after user's confirmation. Accept HTTP,HTTPS and optionally basic authenticationdata-loopback_uri:https://merchant.com/?a=1&b=2&...(string, required) - Urlencoded URI used by DropPay mobile app to drive user back to calling application. It can be a HTTP schema or a custom schema likeyourapp://.... Will be appended withAuthorizationid.data-policy:CHARGEABLE(string, optional) - Switch to control authorization policy to be applied to authorization. One of [CHARGEABLE,BOOKABLE]. Default to ´CHARGEABLE´